Today I am focusing on how to create a minimalistic Singly Linked List. A linked list is a data structure that contains a sequence of data linked with each other. Each element in the link can contain a value and reference to the next element in the link. The elements we called as Nodes.
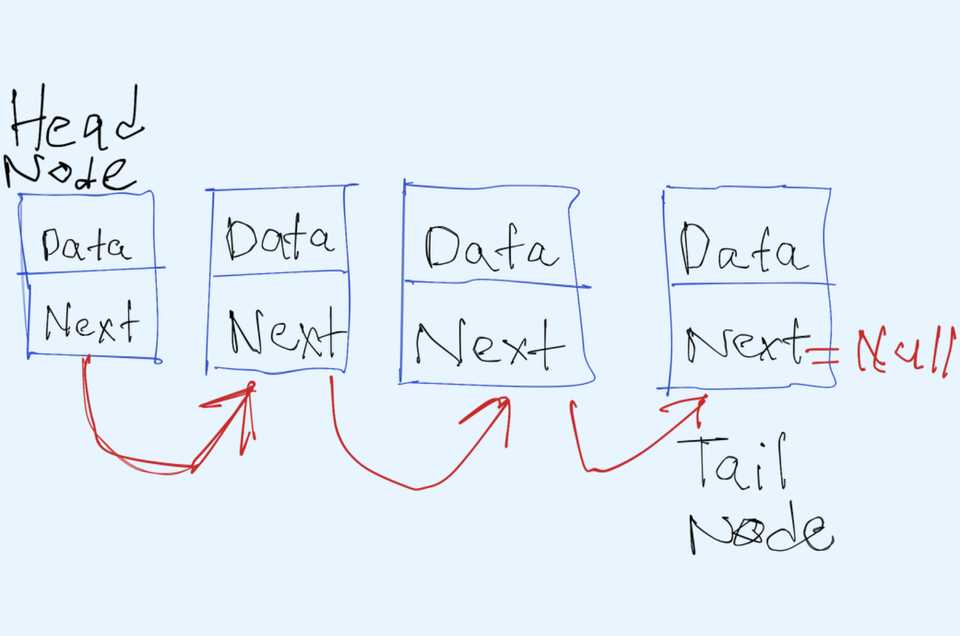
We can present the Linked List as below picture. You can see, apart from the last node, all are pointing to its’ next node.
The starting node is called as Head Node and the last node is Tail Node. As I explain earlier every node can keep data and the next item’s reference.If we want to go to the 3rd node we need to start from the 1st node keep going until we reach the 3rd node.
Okay, let’s start coding a Linked List(I am using C# here).
First, we create a Node class that keeps data and the next element. I will start will int datatype and later I will change this to keep generic data type.
public class Node
{
    public Node(int value)
    {
        Value = value;
    }

    public int Value { get; set; }
    public Node Next { get; set; }

}
Here we are keeping data in Value property and next Node object will keep in Next property.
Now we can start to create a LinkedList class.
public class LinkedList: ICollection<int> {
}
We are using ICollection interface. With that, we can leverage the inbuild enumeration functionality.
Next, we are adding public Head and Tail properties. Using those we can return Head and Tail of the Linked List any time and these are public variables. Also, we have 2 private variables as head and tail to keep Nodes internally.
public class LinkedList: ICollection<int>
{
    private Node head
    {
        get;
        set;
    }
    private Node tail
    {
        get;
        set;
    }
    public int Head { get {return head.Value;}}
    public int Tail { get { return tail.Value;}}
    public int Count
    {
        get;
        private set;
    }
}
This Count property from ICollection implementation.
There are 2 ways to add value to the linked list. We can add a value to the head or add a value to the tail. Let’s start with adding a value to the tail.
Add to Tail
Here is the code to add value to the tail.
public void AddTail(int value)
{
    var node = new Node(value);

    if (Count == 0) // A
    {
        head = node;
    }
    else
    {
        tail.Next = node; // B
    }
    tail = node; // C
    Count++;
}
Let me explain this code. To demonstrate let’s assume the below code.
LinkedList linkedList = new LinkedList();
for (int i = 0; i < 5; i++)
{
    linkedList.AddTail(i);
}
When i = 0
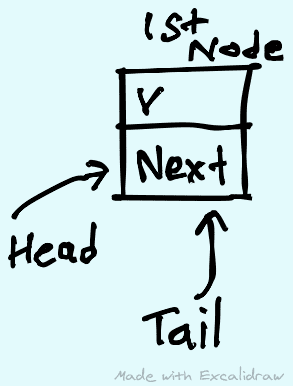
head and tail are null. Also Count is 0 . So, it will go inside // A block and set head to that node. Also, it will set tail to that node.
When i = 1
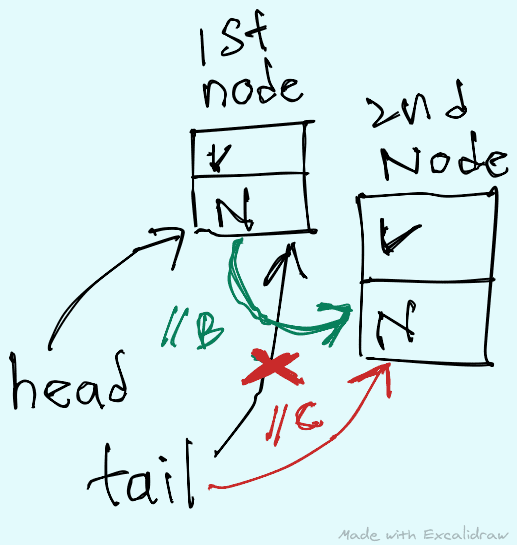
Now we create the second Node variable. Because Count is 1 it will go to // B and set the tail’s Next property to this node. It implies that head ‘s Next property also.
Then tail variable referencing the same node also. Let’s put in to picture.
When i = 1 tail also referring the head. Once we set the tail.Next to new node that means head’s Next also be the new node. I added colors with comment reference to each block that what happen in each block.
This is possible because every time we assign a variable to a object, we are passing the reference of that object.
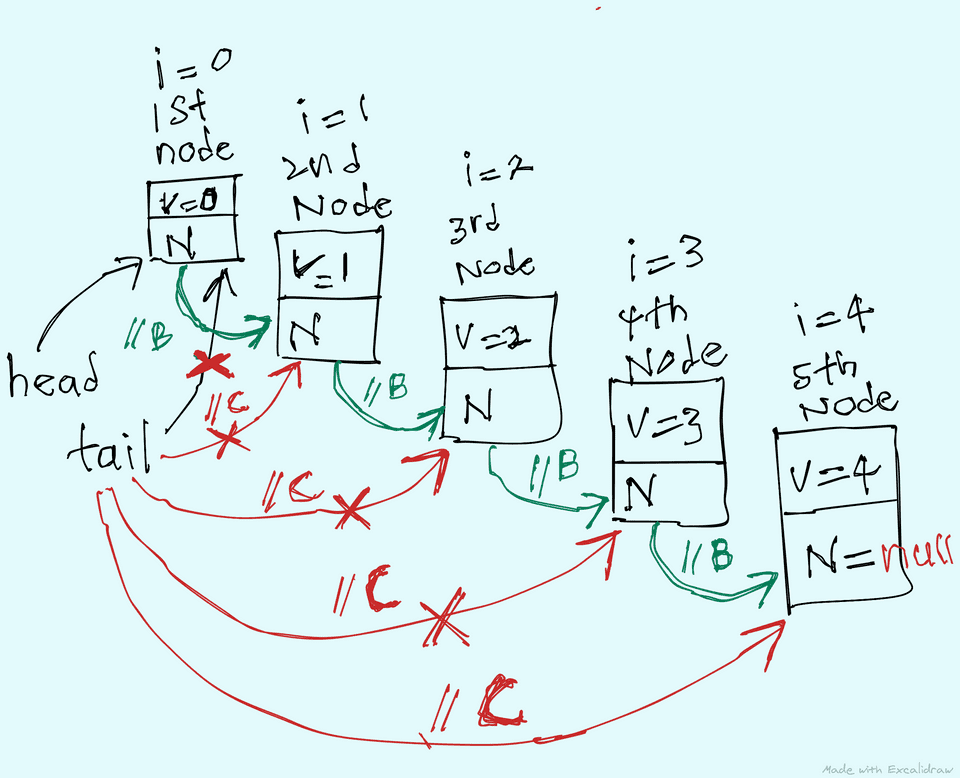
Until for loop break, this will happen. Let me put it into a picture.
The important point that need to mentioned here that always the tail node’s Next property will be null .
Any time, Head and Tail variables will give the head and tail values. Once we are adding values to the tail, most reason value always is in the tail.
Add to Head
This is the reverse methodology of add to tail. Once we adding values to head, that means most reason value will be in the head. The least reason value will be in the tail.
Here is the code block to add value to the head method.
public void AddHead(int value)
{
    Node temp = head; // A
    head = new Node(value); // B
    head.Next = temp; // C
    Count++;
    if (Count == 1)
    {
        tail = head; // D
    }
}
To simulate this code block let’s use our usual for loop example.
LinkedList linkedList = new LinkedList();
for (int i = 0; i < 5; i++)
{
    linkedList.AddHead(i);
}
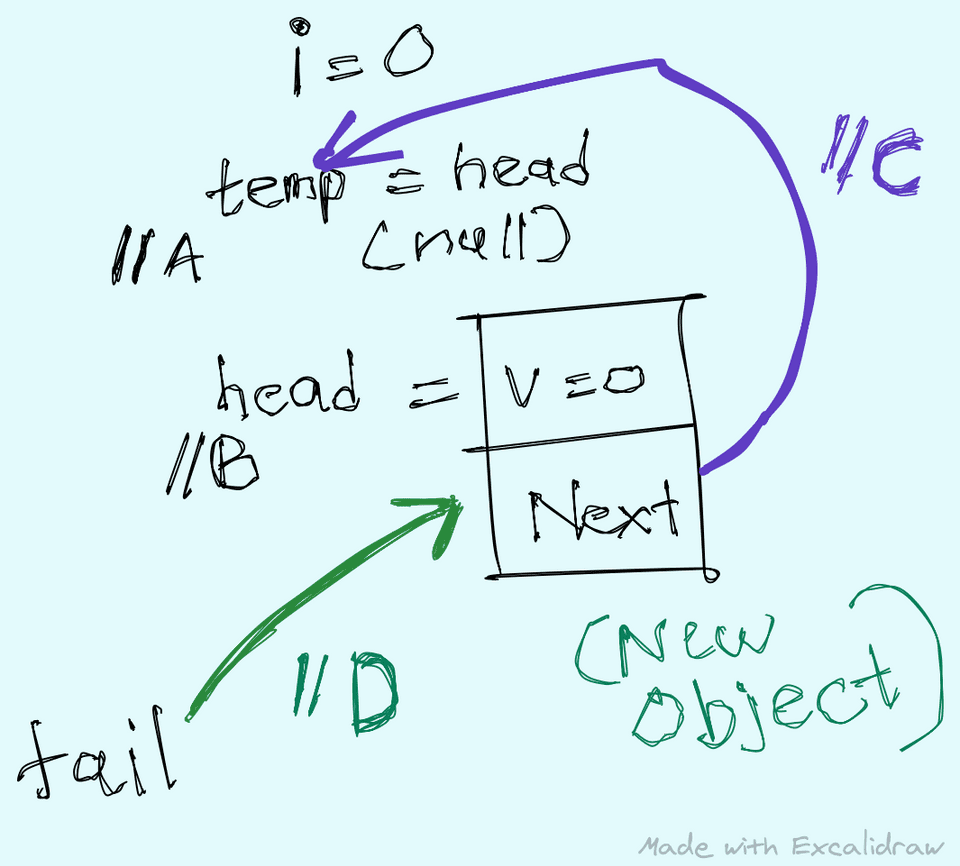
When i=0
Our head and tail is equal to null at this moment. In the //A code block we assign our current head to temp variable and at this moment it is null. Then we create a new node that assigning that value and assign it to head. So once we execute //B means always our latest value will be in the head. Then our previous node will assign to head’s Next .
In this moment //D block will be executed and the initial value will assign to tail.
Keep note that this will be only executed when
i=0
Let’s show this in a picture.
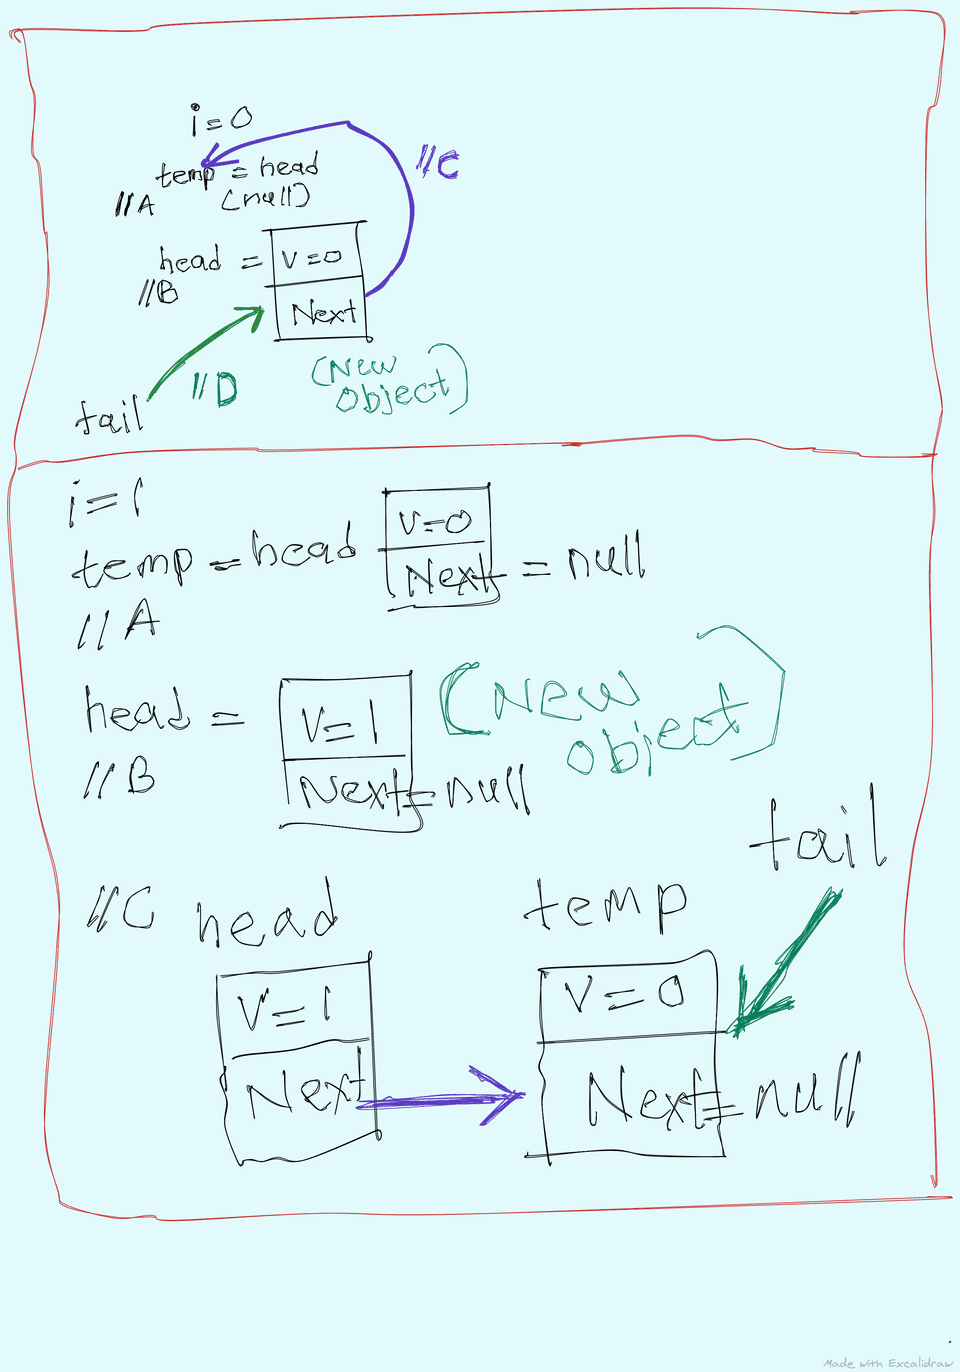
When i = 1
Now is the fun part happen. First, we assign the current head to a temp variable. In the head variable, it only contains one node. Then we create a new node and assign it to head. Then current head ‘s Next will assign the temp variable. Because of that head will always have the latest variable.
Let’s get that into a picture.
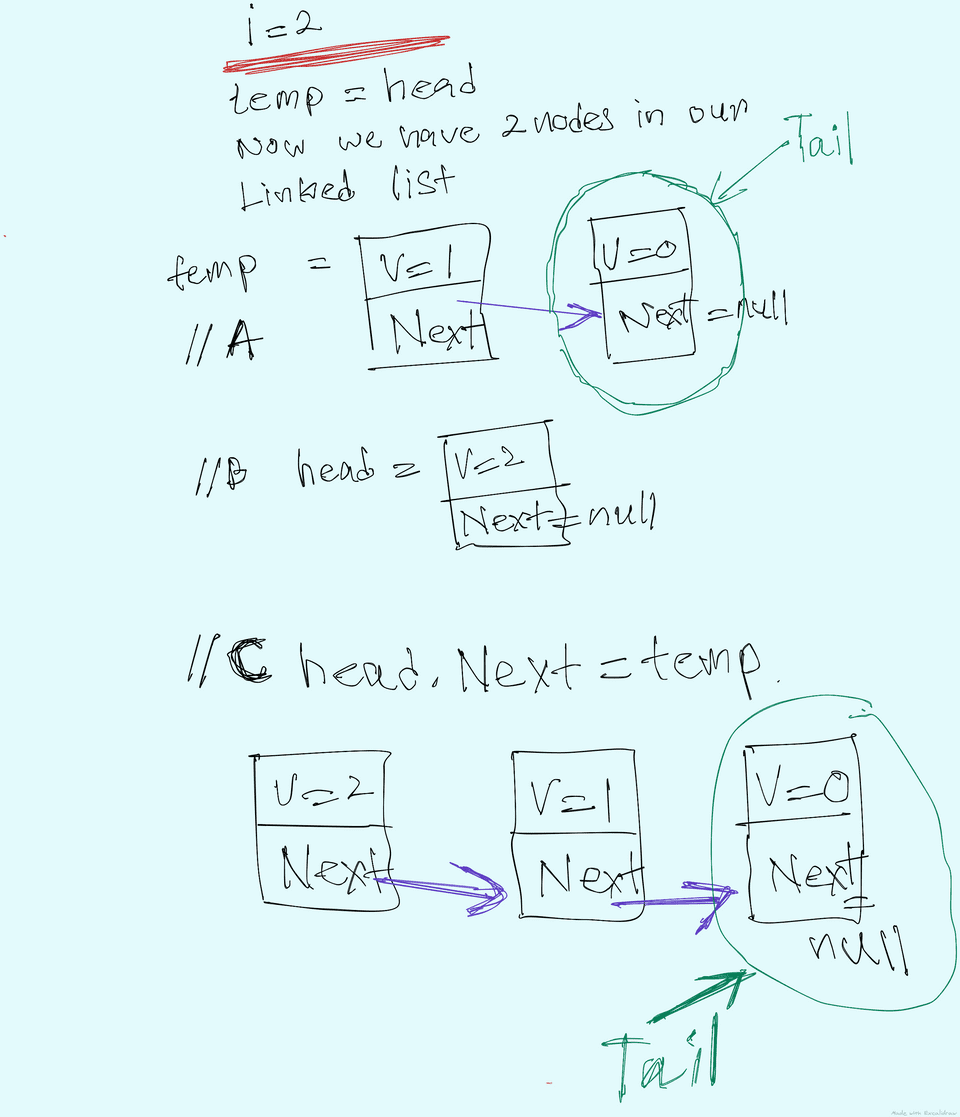
When i = 2
The same thing is going on when i = 2. For more clarity, I will add a picture of it.
This will be repeated until for loop end.
At this point, we added the main functionality for the LinkedList class. Only we have to implement the ICollection interface.
Here are the methods to remove the first item and the last item from Linked List.
public void RemoveFirst()
{
    if (Count != 0)
    {
        head = head.Next;
        Count--;
        if (Count == 0)
        {
            tail = null;
        }
    }
}
public void RemoveLast()
{
    if (Count != 0)
    {
        if (Count == 1)
        {
            head = null;
            tail = null;
        }
        else
        {
            Node current = head;
            while (current.Next != tail)
            {
                current = current.Next;
            }
            current.Next = null;
            tail = current;
        }
        Count--;
    }
}
I hope this covers all the topics that need to cover on a singly linked list. Hope you guys learned something from this.
I will wrap up this post from here. If you have anything to ask regarding this please leave a comment here. Also, I wrote this according to my understanding. So if any point is wrong, don’t hesitate to correct me. I really appreciate you. That’s for today friends. See you soon. Thank you.

